Tools that treat diagrams as code, such as PlantUML, are invaluable for communicating
complex system behavior. Their text-based format simplifies versioning, automation, and
evolving architectural diagrams alongside code. In my work explaining distributed
systems, PlantUML’s sequence diagrams are particularly useful for capturing interactions
precisely.
However, I often wished for an extension to walk through these diagrams step-by-step,
revealing interactions sequentially rather than showing the entire complex flow at
once—like a slideshow for execution paths. This desire reflects a common developer
scenario: wanting personalized extensions or internal tools for their own needs.
Yet, extending established tools like PlantUML often involves significant initial
setup—parsing hooks, build scripts, viewer code, packaging—enough “plumbing” to
deter rapid prototyping. The initial investment required to begin can suppress good
ideas.
This is where Large Language Models (LLMs) prove useful. They can handle boilerplate
tasks, freeing developers to focus on design and core logic. This article details how I
used an LLM to build PlantUMLSteps, a small extension adding step-wise
playback to PlantUML sequence diagrams. The goal isn’t just the tool itself, but
illustrating the process how syntax design, parsing, SVG generation, build automation,
and an HTML viewer were iteratively developed through a conversation with an LLM,
turning tedious tasks into manageable steps.
Diagram as code – A PlantUML primer
Before diving into the development process, let’s briefly introduce PlantUML
for those who might be unfamiliar. PlantUML is an open-source tool that allows
you to create UML diagrams from a simple text-based description language. It
supports
various diagram types including sequence, class, activity, component, and state
diagrams.
The power of PlantUML lies in its ability to version control diagrams
as plain text, integrate with documentation systems, and automate diagram
generation within development pipelines. This is particularly valuable for
technical documentation that needs to evolve alongside code.
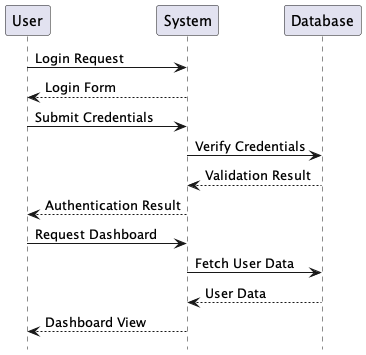
Here’s a simple example of a sequence diagram in PlantUML syntax:
@startuml

hide footbox

actor User
participant System
participant Database

User -> System: Login Request
System --> User: Login Form

User -> System: Submit Credentials
System -> Database: Verify Credentials
Database --> System: Validation Result
System --> User: Authentication Result

User -> System: Request Dashboard
System -> Database: Fetch User Data
Database --> System: User Data
System --> User: Dashboard View
@enduml
When processed by PlantUML, this text generates a visual sequence diagram showing the
interaction between components.

The code-like nature of PlantUML makes
it easy to learn and use, especially for developers who are already comfortable
with text-based tools.
This simplicity is what makes PlantUML a perfect candidate for extension. With the
right tooling, we can enhance its capabilities while maintaining its text-based
workflow.
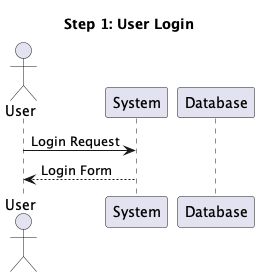
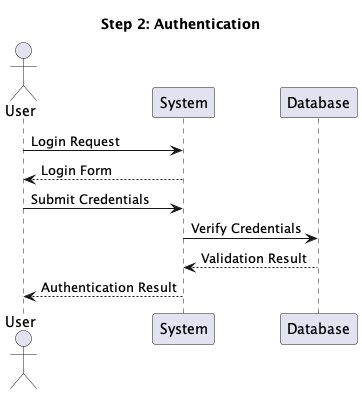
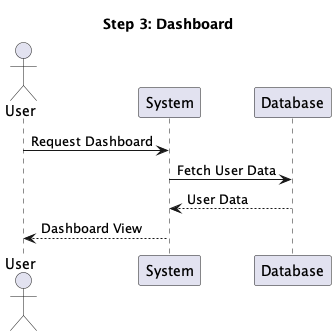
Our goal for this project is to create a tool which can divide the
sequence diagram into steps and generate a step by step view of the diagram.
So for the above diagram, we should be able to view login, authentication and
dashboard
steps one by one.
Step 2: Building the Parser Logic (and Debugging)
“Now we need to parse the plantuml files and separate out step. Whenever we
encounter a step marker, we create a step object and keep adding the next lines
to it until we encounter another step marker or end of file. In case we
encounter another step counter, we create new step object, it should have all
the includes, actors and participants from the previous step. It should also
have all the content of the previous step, unless the step metadata has
‘newPage’ attribute. If there are no step markers encountered, which is the case
where we have files without steps, it should create a default step. Create a
StepParser to parse given puml files and create list of steps.”
Claude generated the initial code for a StepParser class and a Step model class to
handle parsing PlantUML files with step markers. The initial implementation had some
logical issues:
- Incorrect handling of step content inheritance when newPage attribute was false
- Improper handling of declarations (actors, participants) appearing before the
first step marker - Issues with creating a default step for files without markers
The Cursor editor was running in Agent mode, so after running tests and identifying
these issues through the failure messages, Claude provided a corrected version that
properly handled:
- Content collected before the first step marker
- Inheritance of content from the immediately preceding step
- Global tracking of declarations across steps
- Proper creation of a default step for files without markers
With these corrections, the parser successfully passed all tests.
The next step was to generate a gradle task.
We need gradle task which can process puml files in src/diagrams and its sub
folders. For each file it should create a directory with the name of the file where
it generates valid puml file for each step. It can generate that by just adding
@startuml at the start and @enduml at the end of the step content.
I’ll help you create a Gradle task to process PlantUML files and generate
step-by-step diagrams. First, let’s create the task in
build.gradle:
// Process each .puml file in the input directory and its subdirectories
fileTree(inputDir).include('**/*.puml').each { pumlFile ->
    def relativePath = inputDir.toPath().relativize(pumlFile.toPath()).toString()
    def fileName = pumlFile.name.replace('.puml', '')
    def stepOutputDir = new File(outputDir, fileName)

    if (!stepOutputDir.exists()) {
        stepOutputDir.mkdirs()
    }

    // Run the generator for this file
    javaexec {
        classpath = sourceSets.main.runtimeClasspath
        mainClass = 'com.example.StepDiagramGenerator'
        args = [pumlFile.absolutePath, stepOutputDir.absolutePath]
    }
Claude also helped generating a simple plantuml sequence diagram to test the gradle
task. The same one that we used at the beginning of the article.
The gradle task needed a class PlantUMLGenerator which
can generate SVGs for each step.
Cursor in the Agent mode generated the code for the class.
It then ran the build to verify the task.
Let's run a test to confirm our implementation works: cd /Users/unmeshjoshi/work/plantumlsequence && ./gradlew clean build

Task :generateStepDiagrams
Generated step diagram: /Users/unmeshjoshi/work/plantumlsteps/build/generated-diagrams/user-authentication/step-01-step-1-user-login.puml
Generated step diagram: /Users/unmeshjoshi/work/plantumlsteps/build/generated-diagrams/user-authentication/step-02-step-2-authentication.puml
Generated step diagram: /Users/unmeshjoshi/work/plantumlsteps/build/generated-diagrams/user-authentication/step-03-step-3-dashboard.puml
Generated step flow summary: /Users/unmeshjoshi/work/plantumlsteps/build/generated-diagrams/user-authentication/summary.puml

        BUILD SUCCESSFUL in 543ms
        3 actionable tasks: 3 executed
Step 3: Generating HTML Viewer for Step Sequence
The next step was to generate a simple HTML viewer that can be used to view the step
sequence.
Now we need to generate a HTML viewer for the step files to be shown one by one.
The HTML viewer can have a view area where we show the svg image generated for each
step with the step name in the metadata for that step. We can have next and previous
buttons to show next and previous step image.
I’ll help you create an HTML viewer for the step diagrams. We’ll need to: Generate
SVG files from the PlantUML files Create an HTML viewer with navigation controls
Update the Gradle task to generate both PlantUML and SVG files, along with the HTML
viewer First, let’s create a simple HTML template for the viewer:
….
The agent mode figured out a few issues with the template but auto-fixed it by
running some corrective actions.
This setup allowed us to quickly generate step diagrams from a single PlantUML file,
and view them in a step by step manner. So the above diagram can be viewed as a
sequence of following steps:


The Code is the Source of Truth
Where to go from here?
While the prompts and the LLM assistant (in this case, interacting in an agent-like
mode, utilizing models like Claude Sonnet) provided a remarkably effective way to
generate a working first version of PlantUMLSteps, it’s crucial to
recognize the nature of this generated output.
- Prompts are not Deterministic: The prompts used in our conversation were
effective for this interaction, but they cannot be treated as the ultimate
‘source of truth’. The same prompts given to a different model, or even the same
model at a later date, are not guaranteed to produce the exact same output due
to the inherent variability in LLM generation. - Code Requires Management: The generated code is the source of truth for
the tool’s functionality. As such, it needs to be treated like any other
software artifact – checked into version control, reviewed, tested, and
maintained. - Review for Habitability: It’s essential to revisit the LLM-generated code
after the initial creation phase. Is it ‘habitable’? That is, is it reasonably
easy to read, understand, and modify by a human developer? While the LLM helped
overcome initial hurdles and boilerplate, ensuring the long-term maintainability
and clarity of the codebase often requires human review and potential
refactoring. The goal is code that not only works but can also be evolved
effectively over time.
Prompting in natural language (like English) to generate code works well in the
early phases of development—when you’re exploring ideas, scaffolding functionality,
or getting familiar with a new tool or framework. But as your system starts to take
shape, the limits of vague or broad prompts become apparent. At this stage, what’s
needed is not more code generation, but conceptual modeling—using the constructs of
your programming language or technology stack to accurately represent the domain.
This stage needs deeper thinking to build abstractions, and an alignment between
code structure and domain concepts—something only achievable through thoughtful
design, not just prompting. If prompt-based code generation without
review is called “vibe coding,” then the more disciplined approach can be
called “AI-assisted structured coding.”.
Beyond Code Generation: The Developer Insight in Refactoring
The next step was to refactor the code to make it more readable and maintainable.
Initially, the parse method was a long, monolithic function that handled everything
from
detecting step markers to managing declarations and content. The code was difficult
to
understand and maintain.
The full code is available in
this initial commit on GitHub.
The `StepParser.java` parse method needs refactoring. It should represent concepts
used in the requirement or domain concepts and follow standard clean code practices
with intentional method names and code that reads like a DSL.
This initial request was open-ended, indicating that the developer recognized the
need for improvement but was looking for guidance on how to approach it.
The LLM responded with a comprehensive refactoring that introduced several new
classes and methods:
- Introduced `PlantUmlDocument` to represent the document being parsed
- Smaller, more focused methods with intention-revealing names
- Better encapsulation of related behaviors
- More expressive variable and method names


    /**
     * Represents a PlantUML document being parsed, managing state during parsing
     */
    private class PlantUmlDocument {
        private final List steps = new ArrayList<>();
        private final List declarations = new ArrayList<>();
        private final List contentBeforeFirstStep = new ArrayList<>();
        private Step currentStep = null;
        private boolean hasStepMarkers = false;

        public void beginNewStep(StepMetadata metadata) {
            hasStepMarkers = true;

            // Save the current step if it exists
            if (currentStep != null) {
                steps.add(currentStep);
            }

            // Create a new step
            currentStep = new Step(metadata.getName(), metadata.isNewPage(), metadata.getAttributes());

            // Add all declarations to the new step
            currentStep.addAllDeclarations(declarations);

            // If this isn't a new page and we have previous steps, copy all content from previous steps
            if (!metadata.isNewPage() && !steps.isEmpty()) {
                carryOverPreviousStepsContent();
            }
        }

        private void carryOverPreviousStepsContent() {
            for (Step previousStep : steps) {
                for (String contentLine : previousStep.getContent()) {
                    currentStep.addContent(contentLine);
                }
            }
        }

        public void addDeclaration(String line) {
            declarations.add(line);

            if (currentStep != null) {
                currentStep.addDeclaration(line);
            } else {
                contentBeforeFirstStep.add(line);
            }
        }

        public void addContentLine(String line) {
            if (currentStep != null) {
                currentStep.addContent(line);
            } else if (!line.trim().isEmpty()) {
                contentBeforeFirstStep.add(line);
            }
        }

        public void finalizeDocument() {
            // Add the last step if it exists and hasn't been added yet
            if (currentStep != null) {
                steps.add(currentStep);
            }
        }
The full code is available in
this commit on GitHub.
The `contentBeforeFirstStep` in `PlantUmlDocument.java` is used only for creating
default step when there are no step markers?
So we can possibly
do two pass processing where we first check if there are step markers.. if there
are.. we do step-based processing. Or else we just create a default step and add all
declarations and content. That will remove the need to have `contentBeforeFirstStep`
We can also possibily name PlantUmlDocument as `ParsedPumlFile` which represents
the parsed puml file.
The LLM implemented this suggestion with a two-pass approach. It also renamed the
PlantUmlDocument as ParsedPumlFile.
The full code is available in
this commit on GitHub.
`ParsedPumlFile` can be better represented as builder pattern.
`StepBuilder` can be a builder for `Step` objects.
This insight demonstrated the developer’s ability to recognize design patterns,
noting that the refactored class followed the Builder pattern.
The final refactoring represents a significant improvement over the original code:
class StepBuilder {
    private final List steps = new ArrayList<>();
    private final List globalDeclarations = new ArrayList<>();
    private Step currentStep = null;

    public void startNewStep(StepMetadata metadata) {
        if (currentStep != null) {
            steps.add(currentStep);
        }

        currentStep = new Step(metadata);
        currentStep.addAllDeclarations(globalDeclarations);

        if (!metadata.isNewPage() && !steps.isEmpty()) {
            // Copy content from the previous step
            Step previousStep = steps.get(steps.size() - 1);
            for (String contentLine : previousStep.getContent()) {
                currentStep.addContent(contentLine);
            }
        }
    }

    public void addDeclaration(String declaration) {
        globalDeclarations.add(declaration);

        if (currentStep != null) {
            currentStep.addDeclaration(declaration);
        }
    }

    public void addContent(String content) {
        // If no step has been started yet, create a default step
        if (currentStep == null) {
            StepMetadata metadata = new StepMetadata("Default Step", false, new HashMap<>());
            startNewStep(metadata);
        }

        currentStep.addContent(content);
    }

    public List build() {
        if (currentStep != null) {
            steps.add(currentStep);
        }

        return new ArrayList<>(steps);
    }
}
The full code is available in
this commit on GitHub.
There are more improvements possible,
but I have included a few to demonstrate the nature of collaboration between LLMs
and developers.
Conclusion
Each part of this extension—comment syntax, Java parsing logic, HTML viewer, and
Gradle wiring—started with a focused LLM prompt. Some parts required some expert
developer guidance to LLM, but the key benefit was being able to explore and
validate ideas without getting bogged down in boilerplate. LLMs are particularly
helpful when you have a design in mind but are not getting started because of
the efforts needed for setting up the scaffolding to try it out. They can help
you generate working glue code, integrate libraries, and generate small
UIs—leaving you to focus on whether the idea itself works.
After the initial working version, it was important to have a developer to guide
the LLM to improve the code, to make it more maintainable. It was critical
for developers to:
- Ask insightful questions
- Challenge proposed implementations
- Suggest alternative approaches
- Apply software design principles
This collaboration between the developer and the LLM is key to building
maintainable and scalable systems. The LLM can help generate working code,
but the developer is the one who can make it more readable, maintainable and
scalable.

