Learn everything about Swift modules, libraries, packages, closed source frameworks, command line tools and more.
Basic definitions
First of all you should have a clear understanding about the basic terms. If you already know what’s the difference between a module, package, library or framework you can skip this section. However if you still have some mixed feelings about these things, please read ahead, you won’t regret it. 😉
Package
A package consists of Swift source files and a manifest file.
A package is a collection of Swift source files. If you are using Swift Package Manager you also have to provide a manifest file in order to make a real package. If you want to learn more about this tool, you should check my Swift Package Manager tutorial.
Example: this is your package:
Sources
    my-source-file.swift
Package.swift
You can also check out the open sourced swift-corelibs-foundation package by Apple, which is used to build the Foundation framework for Swift.
Library
Library is a packaged collection of object files that program can link against.
So a library is a bunch of compiled code. You can create two kinds of libraries:
From a really simple perspective the only difference between them is the method of “integrating” aka. linking them into your project. Before I tell you more about this process, first we should talk about object files.
Mach-O file format
To create programs, developers convert source code to object files. The object files are then packaged into executable code or static libraries.
When you’re compiling the source files you are basically making object files, using the Mach-O (MachObject) file format. These files are the core building blocks of your applications, frameworks, and libraries (both dynamic and static).
Linking libraries
Linking refers to the creation of a single executable file from multiple object files.
In other words:
After the compiler has created all the object files, another program is called to bundle them into an executable program file. That program is called a linker and the process of bundling them into the executable is called linking.
Linking is just combining all your object files into an executable and resolving all the externals, so the system will be able to call all the functions inside the binary.
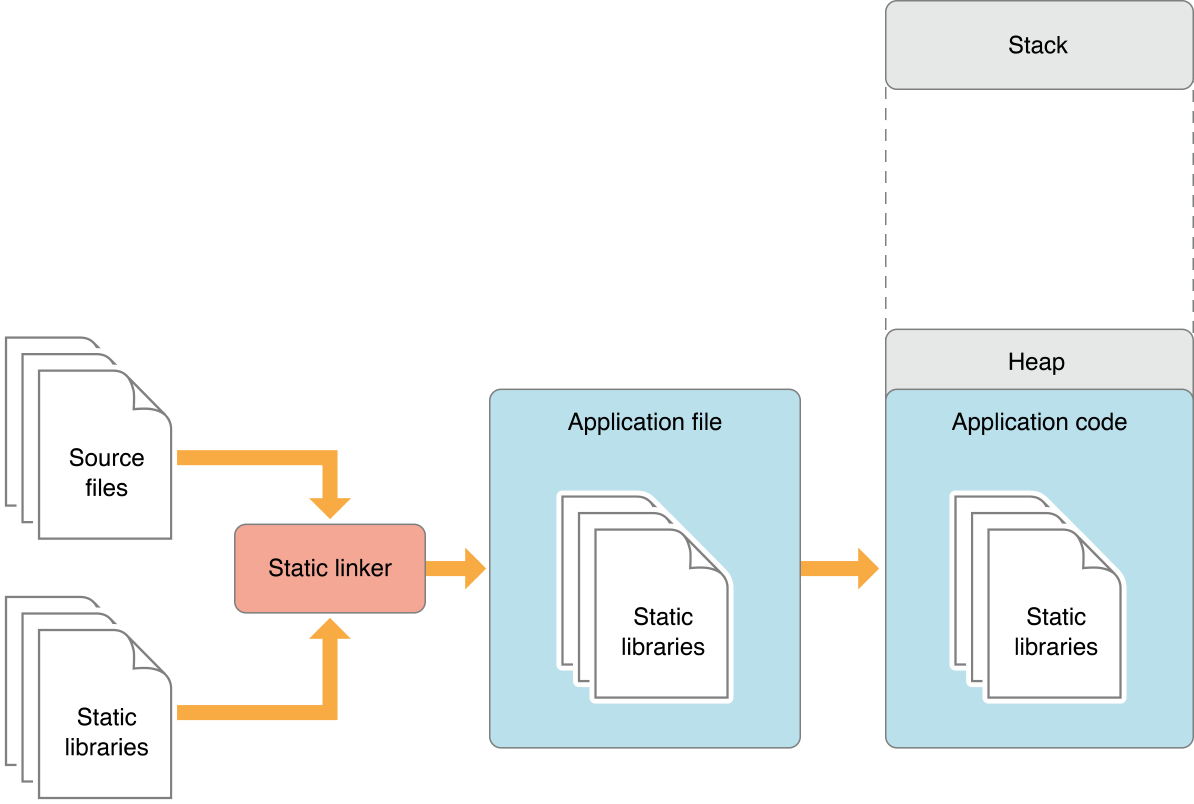
Static linking
The source code of the library is literally going to be copied into the application’s source. This will result in a big executable, it’ll take more time to load, so the binary will have a slower startup time. Oh, did I mention that if you are trying to link the same library more than once, the process will fail because of duplicated symbols?

This method has advantages as well, for example the executable will always contain the correct version of the library, and only those parts will be copied into the main application that are really used, so you don’t have to load the whole stuff, but it seems like dynamic linking is going to be better in some cases.
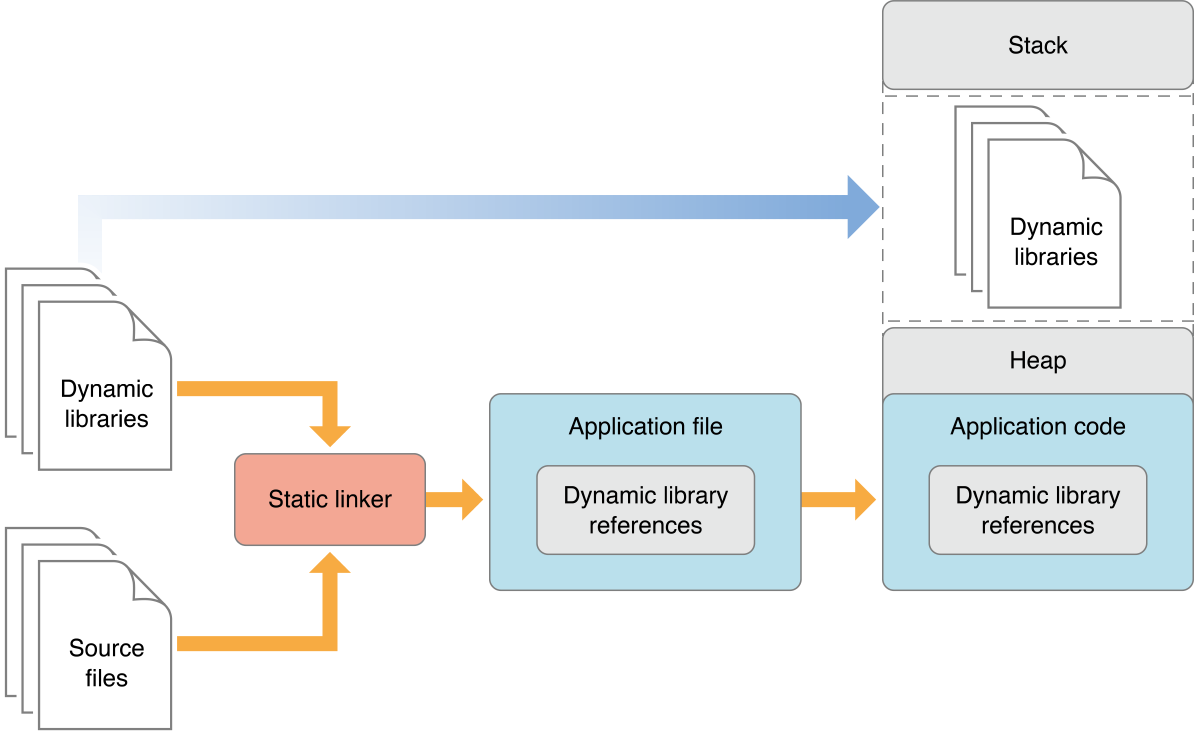
Dynamic linking
Dynamic libraries are not embedded into the source of the binary, they are loaded at runtime. This means that apps can be smaller and startup time can significantly be faster because of the lightweight binary files. As a gratis dynamic libraries can be shared with multiple executables so they can have lower memory footprints. That’s why sometimes they’re being referred as shared libraries.

Of course if the dynamic library is not available – or it’s available but their version is incompatible – your application won’t run or it’ll crash. On the other hand this can be an advantage, because the author of the dynamic library can ship fixes and your app can benefit from these, without recompilation.
Fortunately system libraries like UIKit are always available, so you don’t have to worry too much about this issue…
Framework
A framework is a hierarchical directory that encapsulates shared resources, such as a dynamic shared library, nib files, image files, localized strings, header files, and reference documentation in a single package.
So let’s make this simple: frameworks are static or dynamic libraries packed into a bundle with some extra assets, meta description for versioning and more. UIKit is a framework which needs image assets to display some of the UI elements, also it has a version description, by the way the version of UIKit is the same as the version of iOS.
Module
Swift organizes code into modules. Each module specifies a namespace and enforces access controls on which parts of that code can be used outside of the module.
With the import keyword you are literally importing external modules into your sorce. In Swift you are always using frameworks as modules, but let’s go back in time for a while to understand why we needed modules at all.
import UIKit
import my-awesome-module
Before modules you had to import framework headers directly into your code and you also had to link manually the framework’s binary within Xcode. The #import macro literally copy-pasted the whole resolved dependency structure into your code, and the compiler did the work on that huge source file.
It was a fragile system, things could go wrong with macro definitions, you could easily break other frameworks. That was the reason for defining prefixed uppercased very long macro names like: NS_MYSUPERLONGMACRONAME… 😒
There was an other issue: the copy-pasting resulted in non-scalable compile times. In order to solve this, precompiled header (PCH) files were born, but that was only a partial solution, because they polluted the namespace (you know if you import UIKit in a PCH file it gets available in everywhere), and no-one really maintained them.
Modules and module maps
The holy grail was already there, with the help of module maps (defining what kind of headers are part of a module and what’s the binary that has the implementation) we’ve got encapsulated modular frameworks. 🎉 They are separately compiled once, the header files are defining the interface (API), and the (automatically) linked dylib file contains the implementation. Hurray, no need to parse framework headers during compilation time (scalability), so local macro definitions won’t break anything. Modules can contain submodules (inheritance), and you don’t have to link them explicitly inside your (Xcode) project, because the .modulemap file has all the information that the build system needs.
End of the story, now you know what happens under the hood, when you import Foundation or import UIKit.
Now that you know the logic behind the whole dynamic modular framework system, we should start examining the tools that make this infrastructure possible.
Always read the man pages, aka. RTFM! If you don’t like to read that much, you can download the example project from GitLab and open the makefiles for the essence. There will be 3 main categories: C, Swift and Xcode project examples.
clang
the Clang C, C++, and Objective-C compiler
Clang is a compiler frontend for C languages (C, C++, Objective-C). If you have ever tried to compiled C code with gcc during your university years, you can imagine that clang is more or less the same as gcc, but nowadays it can do even more.
clang -c main.c -o main.o #compiles a C source file
LLVM: compiler backend system, which can compile and optimize the intermediate representation (IR) code generated by clang or the Swift compiler for example. It’s language independent, and it can do so many things that could fit into a book, but for now let’s say that LLVM is making the final machine code for your executable.
swiftc
The Swift compiler, there is no manual entry for this thing, but don’t worry, just fire up swiftc -h and see what can offer to you.
swiftc main.swift #compiles a Swift source file
As you can see this tool is what actually can compile the Swift source files into Mach-O’s or final executables. There is a short example in the attached repository, you should check on that if you’d like to learn more about the Swift compiler.
ar
The ar utility creates and maintains groups of files combined into an archive. Once an archive has been created, new files can be added and existing files can be extracted, deleted, or replaced.
So, in a nutshell you can zip Mach-O files into one file.
ar -rcs myLibrary.a *.o
With the help of ar you were able to create static library files, but nowadays libtool have the same functionality and even more.
ranlib
ranlib generates an index to the contents of an archive and stores it in the archive. The index lists each symbol defined by a member of an archive that is a relocatable object file.
ranlib can create an index file inside the static lib, so things are going to be faster when you’re about to use your library.
ranlib myLibrary.a
So ranlib & ar are tools for maintaining static libraries, usually ar takes care of the indexing, and you don’t have to run ranlib anymore. However there is a better option for managing static (and dynamic) libraries that you should learn…
libtool
create libraries
With libtool you can create dynamically linked libraries, or statically linked (archive) libraries. This tool with the -static option is intended to replace ar & ranlib.
libtool -static *.o -o myLibrary.a
Nowadays libtool is the main option for building up library files, you should definitely learn this tool if you’re into the topic. You can check the example project’s Makefile for more info, or as usually you can read the manuals (man libtool). 😉
ld
The ld command combines several object files and libraries, resolves references, and produces an ouput file. ld can produce a final linked image (executable, dylib, or bundle).
Let’s make it simple: this is the linker tool.
ld main.o -lSystem -LmyLibLocation -lmyLibrary -o MyApp
It can link multiple files into a single entity, so from the Mach-O’s you’ll be able to make an executable binary. Linking is necessary, because the system needs to resolve the addresses of each method from the linked libraries. In other words, the executable will be able to run and all of your functions will be available for calling. 📱
nm
display name list (symbol table)
With nm you can see what symbols are inside a file.
nm myLibrary.a
# 0000000000001000 A __mh_execute_header
#                  U _factorial
# 0000000000001f50 T _main
#                  U _printf
#                  U dyld_stub_binder
As you can see from the output, some kind of memory addresses are associated for some of symbols. Those that have addresses are actually resolved, all the others are coming from other libraries (they’re not resolved yet). So this means that they’ll be resolved at runtime. The other option is that you have to link them. 😅
otool
object file displaying tool
With otool you can examine the contents of Mach-O files or libraries.
otool -L myLibrary.a
otool -tV myLibrary.a
For example you can list the linked libraries, or see the disassembled text contents of the file. It’s a really helpful tool if you’re familiar with the Mach-O file format, also good one to use for reverse-engineer an existing application.
lipo
create or operate on universal files
With the help of the lipo tool you can create universal (multi-architecture) files. Usually this tool is used for creating universal frameworks.
lipo -create -output myFramework.framework devices.framework simulator.framework
Imagine the following scenario: you build your sources both for arm7 and i386. On a real device you’d need to ship the arm7 version, but for the iOS simulator you’ll need the i386 one. With the help of lipo you can combine these architectures into one, and ship that framework, so the end user don’t have to worry about this issue anymore.
Read on the article to see how it’s done. 👇
These tools can be invoked from the command line as well, but they’re much more related to Xcode than the ones before. Let’s have a quick walk-through.
xcode-select
Manages the active developer directory for Xcode and BSD tools. If you have multiple versions of Xcode on your machine this tool can easily switch between the developer tools provided by the induvidual versions.
xcode-select --switch path/to/Xcode.app
xcrun
Run or locate development tools and properties. With xcrun you can basically run anything that you can manage from Xcode.
xcrun simctl list #list of simulators
codesign
Create and manipulate code signatures
It can sign your application with the proper signature. Usually this thing failed when you were trying to sign your app before automatic signing was introduced.
codesign -s "Your Company, Inc." /path/to/MyApp.app
codesign -v /path/to/MyApp.app
xcodebuild
build Xcode projects and workspaces
That’s it. It’ll parse the Xcode project or workspace file and executes the appropriate buid commands based on it.
xcodebuild -project Example.xcodeproj -target Example
xcodebuild -list
xcodebuild -showsdks
FAT frameworks
How to make a closed source universal FATtened (multi-architecture) Swift framework for iOS?
So we’re here, the whole article was made for learning the logic behind this tutorial.
First of all, I don’t want to reinvent the wheel, because there is a beautifully written article that you should read. However, I’d like to give you some more detailed explanation and a little modification for the scripts.
Thin vs. FAT frameworks
Thin frameworks contains compiled code for only one architecture. FAT frameworks on the other hand are containing “slices” for multiple architectures. Architectures are basically referred as slices, so for example the i386 or arm7 slice.
This means, if you compile a framework only for i386 and x86_64 architectures, it will work only on the simulator and horribly fail on real devices. So if you want to build a truly universal framework, you have to compile for ALL the existing architectures.
Building a FAT framework
I have a good news for you. You just need one little build phase script and an aggregate target in order to build a multi-architecture framework. Here it is, shamelessly ripped off from the source article, with some extra changes… 😁
set -e
BUILD_PATH="${SRCROOT}/build"
DEPLOYMENT_PATH="${SRCROOT}"
TARGET_NAME="Console-iOS"
FRAMEWORK_NAME="Console"
FRAMEWORK="${FRAMEWORK_NAME}.framework"
FRAMEWORK_PATH="${DEPLOYMENT_PATH}/${FRAMEWORK}"

# clean the build folder
if [ -d "${BUILD_PATH}" ]; then
    rm -rf "${BUILD_PATH}"
fi

# build the framework for every architecture using xcodebuild
xcodebuild -target "${TARGET_NAME}" -configuration Release \
    -arch arm64 -arch armv7 -arch armv7s \
    only_active_arch=no defines_module=yes -sdk "iphoneos"

xcodebuild -target "${TARGET_NAME}" -configuration Release \
    -arch x86_64 -arch i386 \
    only_active_arch=no defines_module=yes -sdk "iphonesimulator"

# remove previous version from the deployment path
if [ -d "${FRAMEWORK_PATH}" ]; then
    rm -rf "${FRAMEWORK_PATH}"
fi

# copy freshly built version to the deployment path
cp -r "${BUILD_PATH}/Release-iphoneos/${FRAMEWORK}" "${FRAMEWORK_PATH}"

# merge all the slices and create the fat framework
lipo -create -output "${FRAMEWORK_PATH}/${FRAMEWORK_NAME}" \
    "${BUILD_PATH}/Release-iphoneos/${FRAMEWORK}/${FRAMEWORK_NAME}" \
    "${BUILD_PATH}/Release-iphonesimulator/${FRAMEWORK}/${FRAMEWORK_NAME}"

# copy Swift module mappings for the simulator
cp -r "${BUILD_PATH}/Release-iphonesimulator/${FRAMEWORK}/Modules/${FRAMEWORK_NAME}.swiftmodule/" \
    "${FRAMEWORK_PATH}/Modules/${FRAMEWORK_NAME}.swiftmodule"

# clean up the build folder again
if [ -d "${BUILD_PATH}" ]; then
    rm -rf "${BUILD_PATH}"
fi
You can always examine the created framework with the lipo tool.
lipo -info Console.framework/Console
#Architectures in the fat file: Console.framework/Console are: x86_64 i386 armv7 armv7s arm64
Usage
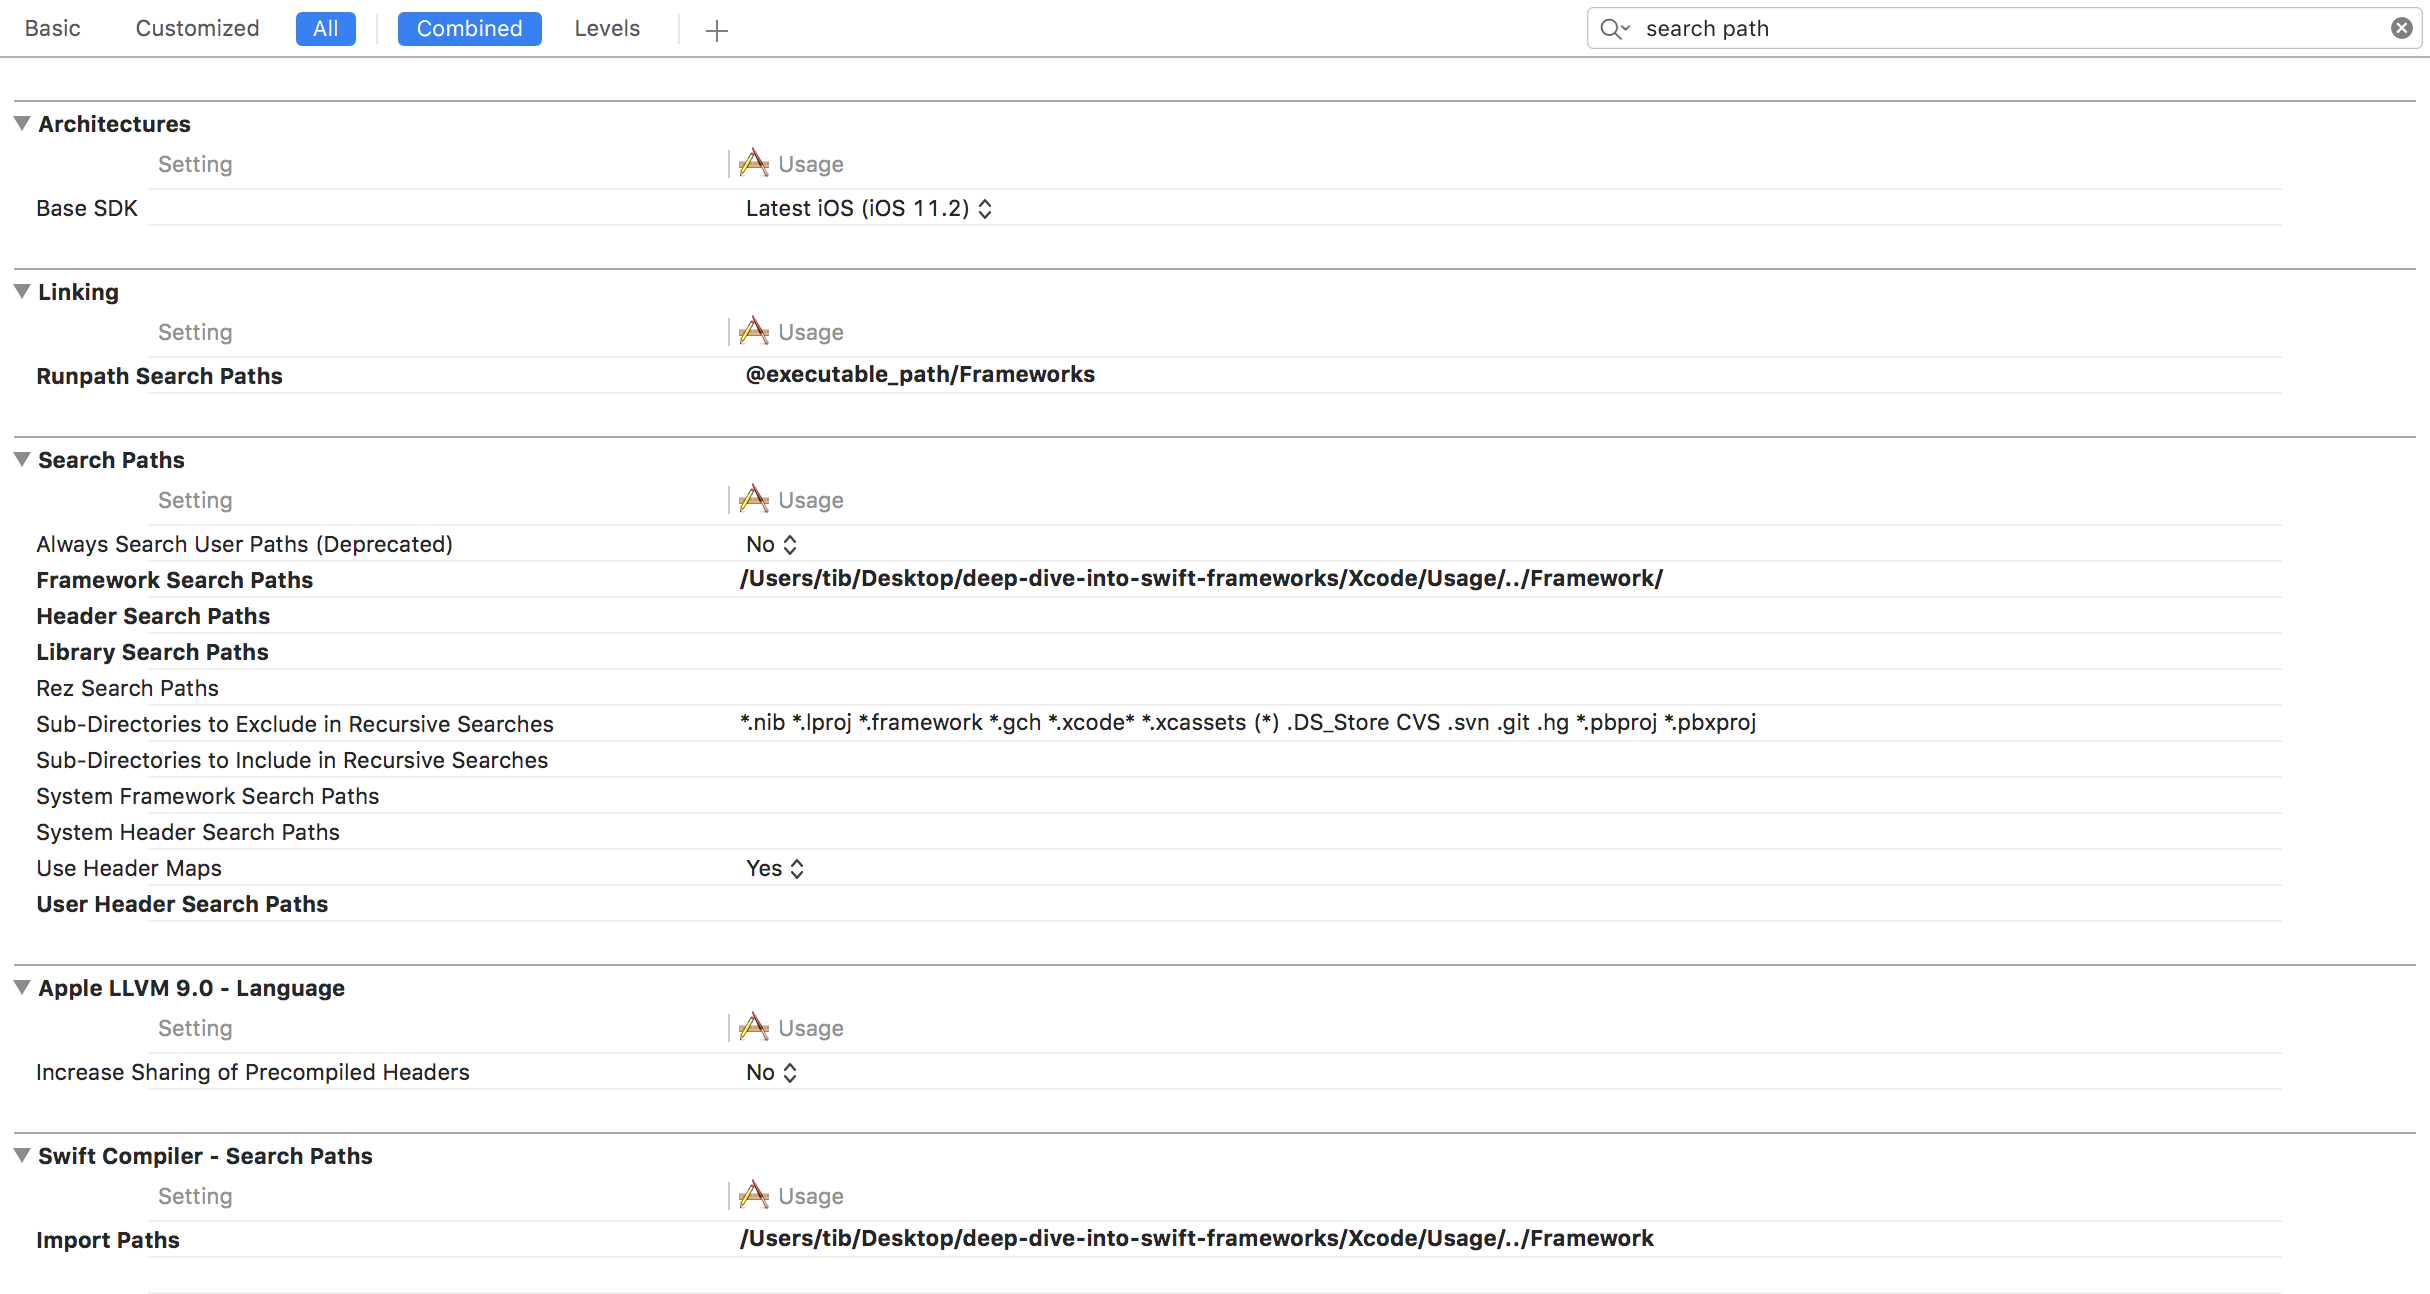
You just have to embed your brand new framework into the project that you’d like to use and set some paths. That’s it. Almost…

Shipping to the App Store
There is only one issue with fat architectures. They contain slices for the simulator as well. If you want to submit your app to the app store, you have to cut off the simulator related codebase from the framework. The reason behind this is that no actual real device requires this chunk of code, so why submit it, right?
APP_PATH="${TARGET_BUILD_DIR}/${WRAPPER_NAME}"

# remove unused architectures from embedded frameworks
find "$APP_PATH" -name '*.framework' -type d | while read -r FRAMEWORK
do
    FRAMEWORK_EXECUTABLE_NAME=$(defaults read "$FRAMEWORK/Info.plist" CFBundleExecutable)
    FRAMEWORK_EXECUTABLE_PATH="$FRAMEWORK/$FRAMEWORK_EXECUTABLE_NAME"
    echo "Executable is $FRAMEWORK_EXECUTABLE_PATH"

    EXTRACTED_ARCHS=()

    for ARCH in $ARCHS
    do
        echo "Extracting $ARCH from $FRAMEWORK_EXECUTABLE_NAME"
        lipo -extract "$ARCH" "$FRAMEWORK_EXECUTABLE_PATH" -o "$FRAMEWORK_EXECUTABLE_PATH-$ARCH"
        EXTRACTED_ARCHS+=("$FRAMEWORK_EXECUTABLE_PATH-$ARCH")
    done

    echo "Merging extracted architectures: ${ARCHS}"
    lipo -o "$FRAMEWORK_EXECUTABLE_PATH-merged" -create "${EXTRACTED_ARCHS[@]}"
    rm "${EXTRACTED_ARCHS[@]}"

    echo "Replacing original executable with thinned version"
    rm "$FRAMEWORK_EXECUTABLE_PATH"
    mv "$FRAMEWORK_EXECUTABLE_PATH-merged" "$FRAMEWORK_EXECUTABLE_PATH"

done
This little script will remove all the unnecessary slices from the framework, so you’ll be able to submit your app via iTunesConnect, without any issues. (ha-ha-ha. 😅)
You have to add this last script to your application’s build phases.
If you want to get familiar with the tools behind the scenes, this article will help you with the basics. I couldn’t find something like this but I wanted to dig deeper into the topic, so I made one. I hope you enjoyed the article. 😉

